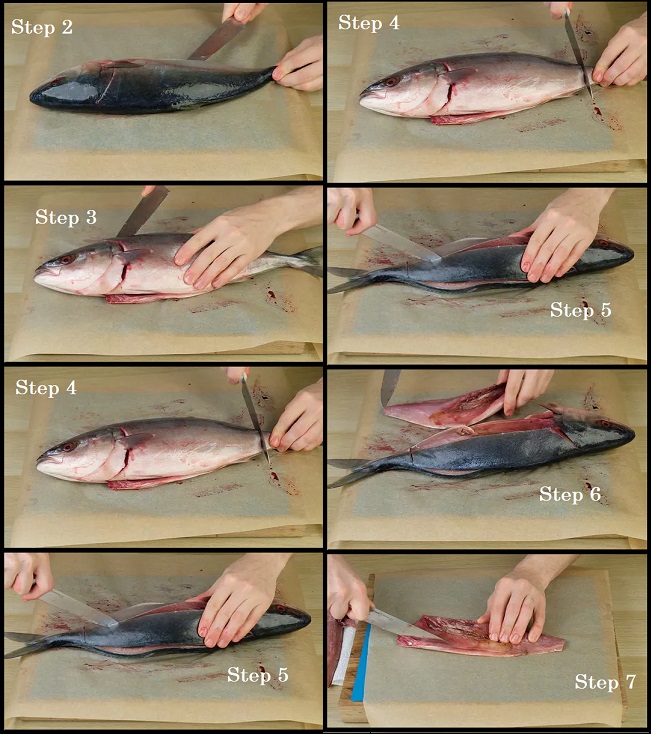
Chumming for Tuna Tips and Tricks
One of the most popular tuna fishing methods is chumming for tuna.
All game fish respond in varying degrees to chum. For some anglers chumming has become an art form, even a science. One thing is absolutely sure, effective chumming techniques produce more fish. Let’s discuss some of the most productive methods that will make you a more successful angler.
Tuna Fishing Chumming Recipe
Supplies & Ingredients:
- 1 box of heavy duty zip lock plastic freezer bags
- 1 five gallon bucket
- a garden hand rake or stirring implement
- Garden Hose
- 1 gallon pure pogy (menhaden) oil
- 1 – 3 pound can whole kernel corn
- Rice, oats, macaroni (optional)
- 12 cans Kozy Kitty cat food (sold at most stores 3/$1)
- 6 loaves of wheat or stone ground bread. Some bakery outlet stores sell old bread for 10 cents per loaf, you must ask for “critter food”.
- Food processor (Warning: You may burn it up and don’t even think about telling the wife what you need it for)
- Electric can opener
Recipe:
- Chop bread in processor
- Dump 12 cans of cat food into bucket, mixing in bread with small amounts of water. Consistency desired like thick soup
- Stir in 2 cups of Pogy oil, evenly distributed
- Take off gas mask and drink one cold beer a safe distance from bucket
- Fill freezer bags and double bag
- Lay bags flat in kitchen freezer (Warning: see Food Processor above)
- Transport chum in designated chum cooler with ice over and under
- Use ½ bag at a time ( fits perfectly into a standard nylon chum bag)
Tuna Fishing Chum Bags
 Chum Bag
  Fishing Bait Bag
 3pcs Bait Bag Chum Bucket
Chumming for Tuna Techniques
Chumming for tuna is a bloody effective way to bring the fish to you, but it is not as simple as chucking a bit of bait overboard and hoping for the best. There is a bit of strategy involved, so we will walk you through it step by step. Lets talk about where to drop your chum, where to place your bait, and a few things to watch out for such as sharks.
Where to Release Your Chum
When you are chumming, it is all about setting up a trail that will drift through the water and lead the tuna straight to you or your lures/baits. You want to pick a spot with a bit of current because that will carry the chum further, spreading the scent and drawing the tuna in from a distance. Dont just toss the chum willy nilly, you got to keep a steady flow going. I like to release a little bit at a time, creating a consistent trail or “chum slick” behind your boat. Remember, your goal is to not to over feed the fish, just get them interested in your baits.
If you are working off a boat, try to position yourself so the wind and current work in your favour to carry the chum behind you. You want to imagine it like laying a breadcrumb trail for the tuna to follow.
When fishing for tuna find your potential fishing spot, hang your chum bag on a stern cleat and allow the current to create a “chum slick” behind your boat.
Where to Put Your Baits when chumming
Once the chum is in the water, you have to think about where to put your bait. The idea here is to make your bait look like it is part of the chum. You don’t want it standing out, it needs to blend in so the tuna don’t suspect a thing.
I usually drop my baits just on the edge of the chum slick. You want them sitting a bit deeper in the water , where the bigger tuna tend to hang out. Depending on the type of tuna you are after, you need to play around with the depth. A float rig can help keep the bait in the strike zone without sinking too far. Sometimes, I will let one bait sit right at the surface to see if any of the tuna are feeding higher up.
Many species like blue fin and mac tuna respond extremely well to this technique by coming up in the water column to eat your free-lined baits. Or, send your chum to the bottom on a hand line or use your downrigger ball. They can’t resist the pogy smell. Neither can nuisance sharks as we will mention below.
Chumming for Tuna Risks
Chumming is all well and good, but there are a few things you must be careful about. First off…. sharks. Those toothy buggers love a free feed and they will happily follow your chum trail just like the tuna. If you are not careful, you will end up with more sharks than you bargained for, and that can be a nightmare to deal with. Keep an eye on what’s coming up in the slick and be ready to move if the sharks take over.
Another thing to watch out for is overfeeding. If you throw too much chum in, the tuna might just gorge themselves and lose interest in your bait. They will be stuffed, and you will be left waiting. Like I said earlier, keep the chum steady but dont over feed the fish.
Lastly, check the local rules. Some places have restrictions on chumming, and the last thing you want is to cop a fine because you didn’t know the regulations.
Chumming can be a brilliant way to bring in the tuna, but it’s got to be done right. Set up a good slick, get your baits in the sweet spot, and keep an eye out for any risks.
Try chumming next time you go fishing for tuna. You will catch more fish. And everyone knows that a day spent on the water fishing is better than a day at work.

Stay tuned for more tips and tricks on How To Catch Tuna.
 Penn Tuna Fishing Rod & Reel Combo
 Penn Tuna Spinning Fishing Reel
 Saltwater Fishing Rod Carbon Fiber
 PENN Lever Drag Conventional Fishing Reel
 Penn Spinning Fishing Reel
 Okuma Trolling Reel
 Braided Fishing Line
 Braided Fishing Line
 Super Strong Braided Fishing Line
 Fishing Fillet Knife – 9 inch
 Fishing Pliers and Knife Combo
 Fillet Knife and Bait Knife